
Oven Clock Reset Guide
Many electric ovens lock the heating function until the clock is set — particularly after a power cut. This guide covers the ten most common oven timer and clock types. Find your panel below and follow the steps.
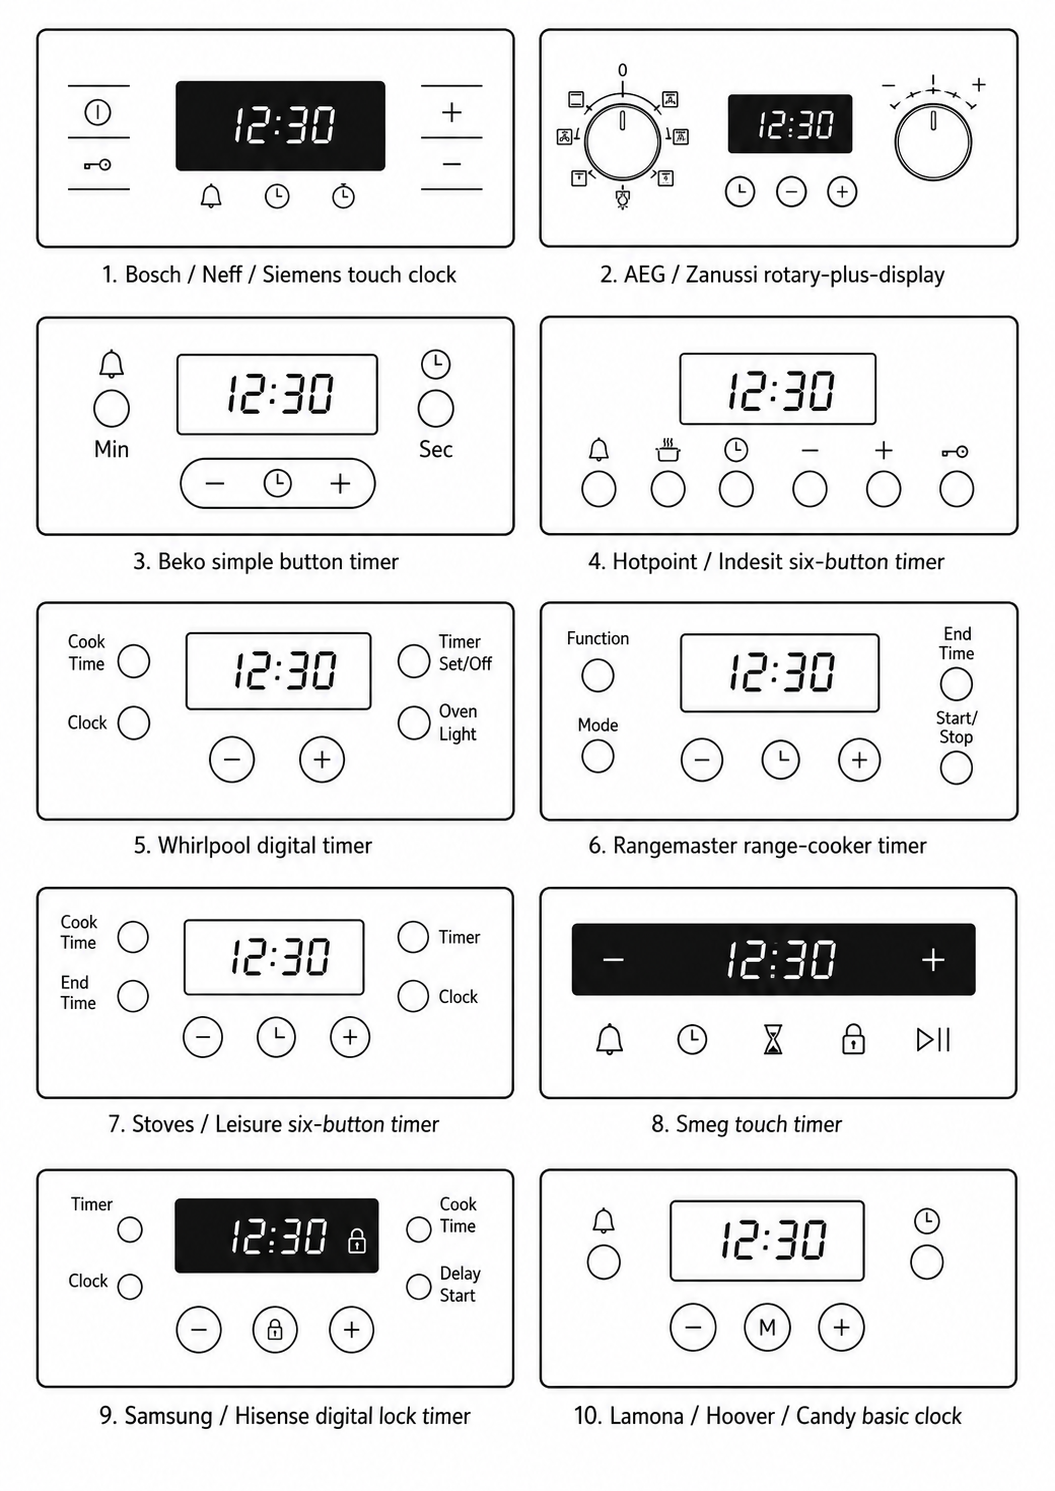
Representative diagrams. Your exact layout may differ between model years.
Jump to your clock type:
- 1. Bosch / Neff / Siemens
- 2. AEG / Zanussi
- 3. Beko
- 4. Hotpoint / Indesit
- 5. Whirlpool
- 6. Rangemaster
- 7. Stoves / Leisure
- 8. Smeg
- 9. Samsung / Hisense
- 10. Lamona / Hoover / Candy
1. Bosch / Neff / Siemens — touch clock
Applies to: Bosch Serie 2, 4, 6, 8 · Neff B-series slide-and-hide · Siemens iQ300, iQ500, iQ700
The touch-button strip runs along the bottom of the control panel. The clock icon sits at the far right. Some models use a dedicated clock symbol (⏱); others label it as a clock face with hands.
- Turn the oven function selector to the off position (the 0 or bullet symbol). The oven must be off before the clock can be edited.
- Touch the clock icon button. The time display begins to flash — this signals edit mode.
- Touch the + button to increase the hour, or − to decrease. Hold for faster advance.
- After a short pause the display moves automatically to the minutes. Use + or − to set the minutes.
- The display stops flashing once the time is confirmed. The oven is now ready to use.
Model note On some Neff and Siemens touch-control panels, press and hold the clock icon for 2–3 seconds to enter edit mode. On models with a separate rotary function knob and a touch timer strip, turn the function knob to the off position first.
Related guides: Neff oven clock reset · Bosch oven clock reset
2. AEG / Zanussi — rotary + display
Applies to: AEG BES, BSE, BPE, BEB series · Zanussi ZOB, ZOP, ZPVF series · Electrolux EOB, EOS series
These ovens combine a rotary function selector with a digital display and + / − touch buttons beside the display. The clock button is usually labelled with a clock face or a small bell symbol.
- Turn the function selector to the off position.
- Press and hold the clock button for 2 seconds until the hours on the display begin to flash.
- Press + to advance the hours to the correct value.
- Press the clock button once to switch to minutes — the minutes will now flash.
- Press + to advance the minutes.
- Wait 5 seconds without pressing anything, or press the clock button once more to save. The display stops flashing.
Older Zanussi note Some older Zanussi models use a manual mechanical timer dial rather than a digital clock. There is no electronic lock on these models. If the dial shows an "auto" or clock symbol position, turn it to the manual position (the hand symbol ✋) to allow the oven to heat without a timed programme running.
3. Beko — simple button timer
Applies to: Beko BIE, BIM, BXIM, BBIM series and most Beko built-in ovens with a button timer panel
Beko ovens with this panel have Min and + / − buttons alongside the display. On some variants the buttons are labelled Min and Sec. The clock or timer button is typically above or beside the display.
- Turn the function selector to off.
- Press and hold the clock or timer button — on some models press both Min and + together — for 3 seconds. The display flashes.
- Press + or the Min button to advance through the hours.
- Press the clock button once to move to minutes, then press + or Min to advance.
- Stop pressing — the clock saves automatically after 5 seconds without input. The display stops flashing.
4. Hotpoint / Indesit — six-button timer
Applies to: Hotpoint SI, SA, DD, FI, UT series · Indesit IFW, IDD, FIM, KFW series · Also some Cannon models
These ovens have a six-button timer strip, typically labelled: Cook Time, Timer, Ta/Off (or T.A./Off), Mode, Oven Light, End Time. The clock is set via the Timer and Cook Time / End Time buttons.
- Turn the function selector to off.
- Press the Timer button repeatedly until the clock icon (not a countdown icon) appears on the display and the hours flash. On some models, hold Timer for 3 seconds.
- Press and hold Cook Time to increase the hours, or End Time to decrease.
- Press Timer again to switch to minutes.
- Press and hold Cook Time to advance the minutes to the correct value.
- Wait — the display gives a short beep or stops flashing to confirm the time is saved.
Auto mode lock When the display shows a clock or A symbol on older Hotpoint models, the oven is in automatic programme mode. The oven will not heat until you cancel the programme by pressing Ta/Off or setting End Time to 0.
5. Whirlpool — digital timer
Applies to: Whirlpool AKZ, AKP, W6, W7, W9 series built-in ovens
Whirlpool built-in ovens use three main timer buttons: Cook Time, End Time, and Clock, alongside a digital display. Some models have a + / − button pair instead of a dial.
- Ensure the oven function is set to off.
- Press the Clock button — the display flashes to indicate edit mode.
- Press + (or hold Cook Time) to advance the hours to the correct value.
- Press Clock again to move to the minutes field.
- Press + to set the minutes.
- Press Clock once more or wait 5 seconds — the display stops flashing and the time is saved.
6. Rangemaster — range-cooker timer
Applies to: Rangemaster Classic, Professional Plus, Nexus, Elise · Also some Aga Rangemaster models
Rangemaster range-cooker timers use − and + buttons beside a digital display, with a clock icon button (sometimes shared with a bell/alarm icon). Larger models may have separate timers for each oven cavity.
- With the oven functions switched off, press the clock icon button on the timer panel. The display begins to flash.
- Press + to advance the hours, or − to go back.
- Press the clock icon again to move to the minutes.
- Press + or − to set the minutes to the correct value.
- Press the clock icon once more, or wait without pressing — the display stops flashing and the time is saved.
Note on gas Rangemaster models We repair the electrical side of Rangemaster appliances only. If your Rangemaster has a gas oven or gas hob fault, contact a Gas Safe registered engineer.
7. Stoves / Leisure — six-button timer
Applies to: Stoves Sterling, Richmond, Precision · Leisure CK, CS, AL series · Also some Falcon models
These ovens use a six-button timer panel similar to Hotpoint/Indesit but with slightly different labelling. The main buttons are Cook Time, End Time, and Timer.
- Turn the function selector to off.
- Press and hold the Timer button for 3 seconds until the hours flash on the display.
- Press the Cook Time button to advance the hours to the correct value.
- Press Timer once to move to the minutes field.
- Press Cook Time to advance the minutes.
- Wait 5 seconds — the display stops flashing and the time is automatically saved.
8. Smeg — touch timer
Applies to: Smeg SF, SFP, SFA, SFPA series · Smeg Classic and Linea built-in ovens
Smeg ovens typically use a touch-control strip with + and − buttons and a clock or timer icon. On Classic range models, the buttons may sit below a stainless panel. On newer Smeg models the entire strip is capacitive touch.
- Switch the oven function selector to off.
- Touch the clock icon. The display flashes — this signals edit mode.
- Touch + to advance the hours, or − to decrease. Hold for faster advance.
- After a short pause without input the display moves automatically to the minutes. Use + or − to set the minutes.
- Wait without touching anything — the display stops flashing and the time is confirmed.
Model note On some older Smeg models (pre-2015), press and hold the clock icon for 3 seconds to enter edit mode rather than a single touch. On models with a separate function dial, ensure the dial is at the off position before touching the clock icon.
9. Samsung / Hisense — digital lock timer
Applies to: Samsung BQ1, BQ2, NV series built-in ovens · Hisense BI series · Some Grundig models
These ovens commonly display a flashing "12:00" or a lock symbol after a power cut. The oven will not heat until the clock is set. The Clock button is the primary control for entering edit mode.
- When the display shows a flashing "12:00" or a padlock symbol, press and hold the Clock button for 3 seconds. The hours begin to flash actively.
- Use the + button (or number pad if present) to set the correct hours.
- Press Clock to confirm the hours and move to the minutes field.
- Use + or the number pad to set the minutes.
- Press Clock or OK to confirm — the display stops flashing and the lock clears. The oven is ready to use.
10. Lamona / Hoover / Candy — basic clock
Applies to: Lamona HJA series · Hoover H-OVEN 300, 500 series · Candy FCP, FCT, FST series · Also some Baumatic and CDA models
These ovens use a simple two-button clock panel. The buttons are typically labelled O (for hours — sometimes written as a circle or "H") and M (for minutes). Each press advances the value by one unit.
- With the oven function dial set to off, press the O button once. The hours on the display begin to flash.
- Press O repeatedly to advance through the hours until you reach the correct hour. (Hold down on some models to advance faster.)
- Press the M button once — the minutes begin to flash.
- Press M repeatedly to advance through the minutes to the correct value.
- Stop pressing. The clock saves automatically after approximately 5 seconds without input. The display stops flashing.
Note on button labelling Some models use different labels: "H" for hours and "M" for minutes, or a small "Set" button instead of separate hour/minute buttons. If O and M do not respond as described, check the trim around the clock panel for a small recessed button labelled "Set" or "Clock".
Clock reset did not fix it?
If the oven still does not heat after the clock is set, the fault is electrical — an element, thermostat, selector switch, thermal cut-out or control board. A clock reset will not fix a component fault.
Book an oven diagnosisPricing
From £49–£99 + parts for a standard visit across Colchester and surrounding towns. Priority or emergency service: standard price + £50. 12-month parts and labour guarantee.